
Password based door locking system using Arduino nano.
OBJECTIVE
The password door locking system aims to grant entry upon correct password input within 5 minutes of the door being locked.
MODULES REQUIRED
- Arduino nano
- LCD 16 x 2
- Buzzer
- Keypad
- Servo
- Potentiometer
SCHEMATIC DIAGRAM
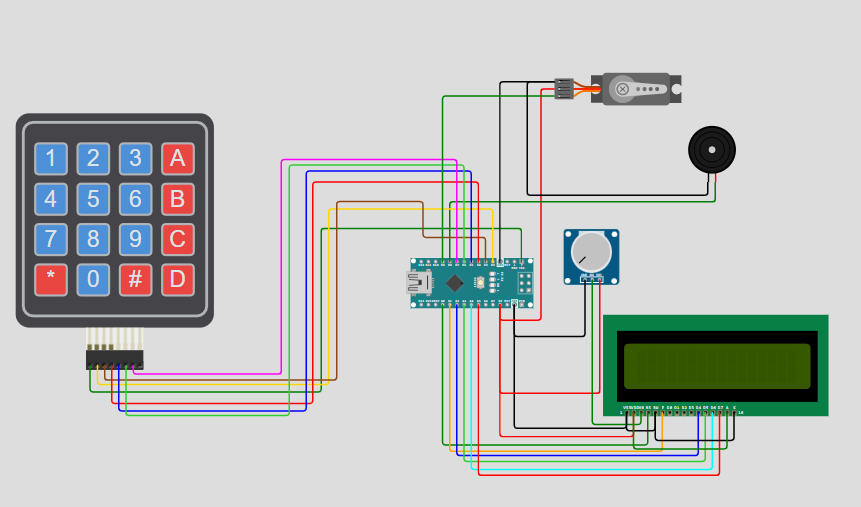
SCHEMATIC CONNECTION
Connect keypad :
Connect servo :
Connect potentiometer :
Connect Buzzer:
Connect Lcd:
To begin your project, click this template link:
ARDUINO CODE
#include (Keypad.h)
#include (LiquidCrystal.h)
#include (Servo.h)

Servo myservo;
LiquidCrystal lcd(A0, A1, A2, A3, A4, A5);

const byte rows = 4, cols = 3;
char keys[rows][cols] = {
  {'1','2','3'}, {'4','5','6'}, {'7','8','9'}, {'*','0','#'}
};
byte rowPins[rows] = {1, 2, 3, 4};
byte colPins[cols] = {5, 6, 7};
Keypad keypad = Keypad(makeKeymap(keys), rowPins, colPins, rows, cols);

const char* password = "4567";
int currentPos = 0, redLED = 10, greenLED = 11, buzzer = 8, failCount = 0;

void setup() {
  Serial.begin(9600);
  lcd.begin(16, 2);
  myservo.attach(9);
  pinMode(redLED, OUTPUT);
  pinMode(greenLED, OUTPUT);
  pinMode(buzzer, OUTPUT);
  welcomeScreen();
}

void loop() {
  char key = keypad.getKey();
  if (key) {
    lcd.clear(); lcd.setCursor(0, 0);
    lcd.print("PASSWORD:");
    lcd.setCursor(0, 1);
    for (int i = 0; i <= currentPos; i++) lcd.print("*");
    beep();

    if (key == password[currentPos]) {
      currentPos++;
      if (currentPos == 4) {
        unlockDoor();
        currentPos = 0;
        failCount = 0;
      }
    } else {
      failCount++;
      wrongPassword();
      currentPos = 0;
      if (failCount == 5) waitPunishment(15000, "15 SECONDS");
      if (failCount == 8) waitPunishment(60000, "1 MINUTE");
    }
  }
}

void welcomeScreen() {
  lcd.clear();
  lcd.setCursor(0, 0);
  lcd.print("*ENTER THE CODE*");
  lcd.setCursor(1, 1);
  lcd.print("TO _/_ (OPEN)!!");
}

void unlockDoor() {
  lcd.clear();
  lcd.print("Access Granted");
  lcd.setCursor(4, 1);
  lcd.print("WELCOME!!");
  buzzPattern();
  moveServo(90, 0);
  delay(2000);
  countdownBeep();
  moveServo(0, 90);
  welcomeScreen();
}

void moveServo(int start, int end) {
  int step = (start < end) ? 5 : -5;
  for (int pos = start; pos != end + step; pos += step) {
    myservo.write(pos);
    delay(15);
  }
}

void wrongPassword() {
  lcd.clear();
  lcd.setCursor(1, 0); lcd.print("CODE INCORRECT");
  lcd.setCursor(4, 1); lcd.print("GET AWAY!!!");
  Serial.println("Unauthorized access attempt.");
  digitalWrite(redLED, HIGH); digitalWrite(buzzer, HIGH);
  delay(2000);
  digitalWrite(redLED, LOW); digitalWrite(buzzer, LOW);
  welcomeScreen();
}

void beep() {
  digitalWrite(buzzer, HIGH); delay(50);
  digitalWrite(buzzer, LOW);
}

void buzzPattern() {
  for (int i = 0; i < 4; i++) {
    digitalWrite(buzzer, HIGH); delay(80);
    digitalWrite(buzzer, LOW); delay(80);
  }
}

void countdownBeep() {
  for (int i = 5; i > 0; i--) {
    lcd.clear();
    lcd.setCursor(2, 0); lcd.print("GET IN WITHIN:");
    lcd.setCursor(6, 1); lcd.print(i);
    digitalWrite(buzzer, HIGH); delay(100);
    digitalWrite(buzzer, LOW); delay(900);
  }
  for (int i = 0; i < 4; i++) {
    digitalWrite(buzzer, HIGH); delay(50);
    digitalWrite(buzzer, LOW); delay(50);
  }
  lcd.clear();
  lcd.print("RE-LOCKING...");
  delay(1000);
  lcd.clear(); lcd.setCursor(4, 0);
  lcd.print("LOCKED!");
  delay(1000);
}

void waitPunishment(unsigned long timeMs, const char* msg) {
  lcd.clear();
  lcd.setCursor(2, 0); lcd.print("WAIT FOR");
  lcd.setCursor(4, 1); lcd.print(msg);
  digitalWrite(buzzer, HIGH);
  delay(timeMs);
  digitalWrite(buzzer, LOW);
  lcd.clear();
  lcd.print("Enjoyed that?");
  delay(2000);
  welcomeScreen();
}