A modern technology banner image

Car Parking Meter with Fare Calculation

OBJECTIVE

To design a car parking meter system that calculates parking fare based on time using Arduino and displays it on an LCD. The system alerts the user when parking time expires, ensuring efficient parking management.

MODULES REQUIRED

  • Arduino uno
  • Lcd 16x2 i2c
  • Push button
  • Buzzer

SCHEMATIC DIAGRAM

Schematic diagram showing an Arduino connected to an LED and a push button.

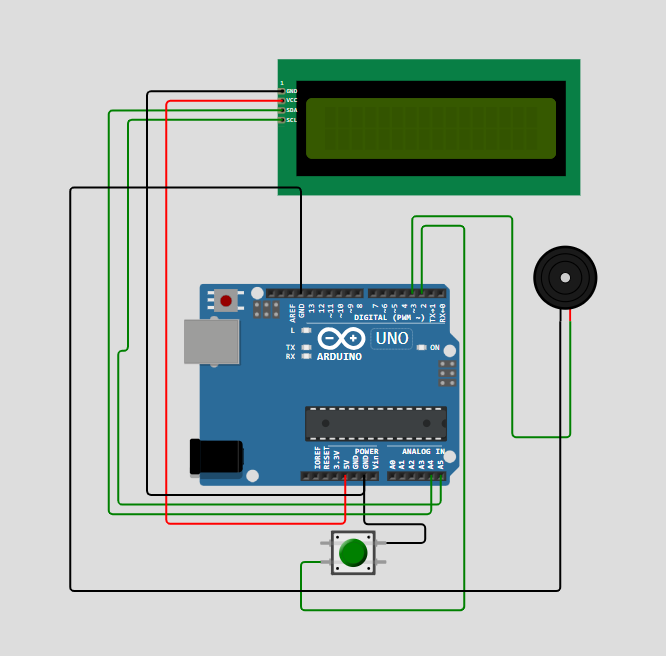
SCHEMATIC CONNECTION

Connect LCD :

  • Connect the VCC pin of the LCD to the 5V pin on the Arduino .
  • Connect the GND pin of the LCD to the GND pin on the Arduino
  • Connect the SDA pin of the LCD to pin A4 on the Arduino.
  • Connect the SCL pin of the LCD to pin A5 on the Arduino.
  • Connect push button :

  • Connect the +ve pin of the push button to the D2 pin on the Arduino .
  • Connect the -ve pin of the push button to the GND pin on the Arduino .
  • Connect Buzzer:

  • Connect the +ve pin of the buzzer to the D3 pin on the Arduino
  • Connect the -ve pin of the buzzer to the GND pin on the Arduino
  • To begin your project, click this template link:

    Simulate on Wokwi

    ARDUINO CODE

    
    #include (Wire.h)
    #include (LiquidCrystal_I2C.h)
    
    LiquidCrystal_I2C lcd(0x27,16,2);
    
    const int buttonPin = 2;
    const int buzzerPin = 3;
    
    int parkingTime = 0;          // in minutes
    float ratePerMinute = 15.0;   // ₹15 per minute
    unsigned long lastMillis = 0;
    
    void setup() {
      pinMode(buttonPin, INPUT_PULLUP);
      pinMode(buzzerPin, OUTPUT);
      lcd.init();
      lcd.backlight();
      lcd.clear();
      lcd.setCursor(0,0);
      lcd.print("Parking Meter");
      updateDisplay();
      delay (300);
    }
    
    void loop() {
      if (digitalRead(buttonPin) == LOW) {
        parkingTime++;
        updateDisplay();
        delay(300);
      }
    
      if (parkingTime > 0 && millis() - lastMillis >= 60000) {
        parkingTime--;
        updateDisplay();
        lastMillis = millis();
      }
    
      if (parkingTime == 0) {
        tone(buzzerPin, 1000);
      } else {
        noTone(buzzerPin);
      }
    }
    
    void updateDisplay() {
      float fare = parkingTime * ratePerMinute;
      lcd.setCursor(0,0);
      lcd.print("Time: ");
      lcd.print(parkingTime);
      lcd.print(" min  ");
      lcd.setCursor(0,1);
      lcd.print("Fare: Rs.");
      lcd.print(fare, 2);
      lcd.print("   ");
    }


    INSTRUCTIONS

  • Assemble the circuit by connecting all components as shown in the schematic diagram.
  • On the left side of the screen, open sketch.ino and write your Arduino code.
  • After completing the circuit and writing the code, click the green Play button to start the simulation.
  • Press the button to add parking time and see the updated fare on the LCD display. When the parking time runs out, a buzzer will sound to alert the user.
  • WORKING PRINCIPLE

  • When the user presses the button, the system adds parking time and calculates the total fare based on a fixed rate per minute. The LCD displays the time and fare, and a buzzer activates when the time reaches zero to alert the user.

  • Project Link

    for your reference.

    `